BikeLife365

BikeLife365

Wednesday, April 27, 2011

Bike Build: Knolly Podium - Wheels, Seat, and Seatpost

by A. Tong

The parts from pricepoint.com have arrived!  I have to say I am more than impressed with them!  The order was shipped out the same day as I ordered and 10 days later, it was at my door step.  Not bad considering I'm ordering from Canada.  I highly recommend anyone try them out!  In fact, I am putting together another list of parts for a DJ build I'm thinking of.  More on that later.

So I decided to go with what I think are some pretty good wheels without having to shell out the big bucks for the more blingly and popular choices.  These wheels were on sale for $349US and I just couldn't say no.  From the reviews I've read, these are ready to take a pounding day after day and come back for more.  For some reason this particular review sold me.  For the more techy reader, Pinkbike has an excellent overview of the wheelset.  Just a note, these wheels came in a bit heavier than stated in the Pinkbike review.  I measured them at 1317g and 1137g for the rear and front wheels respectively with the rim strips installed.  


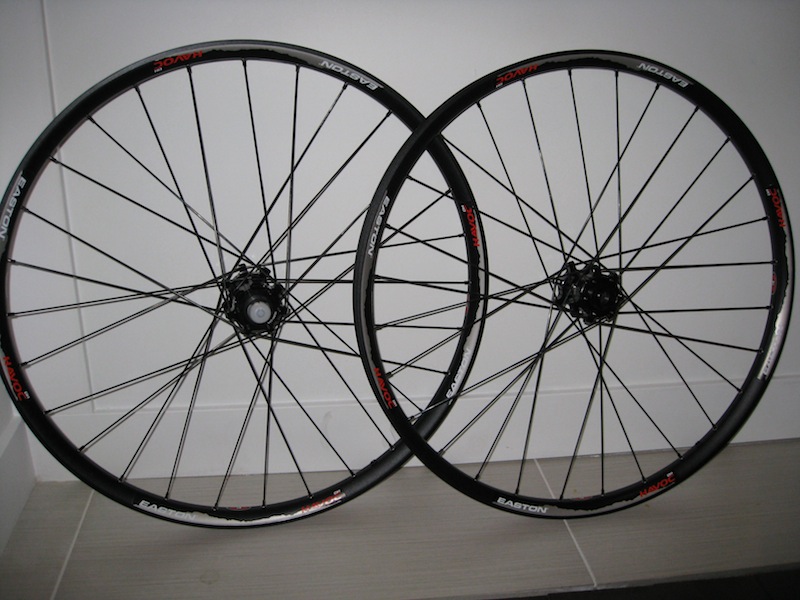
Easton Havoc DH wheels.  Nothing too exciting compared to the shinier wheels out there but the price is right at $349!  Total weight of the wheels is 2454g with rim strips and that little plastic cap on the rear wheel.  Subtract 1-2g for that if you want. 

Straight pull spokes increase the strength of the wheel and in my opinion, look pretty darn good!

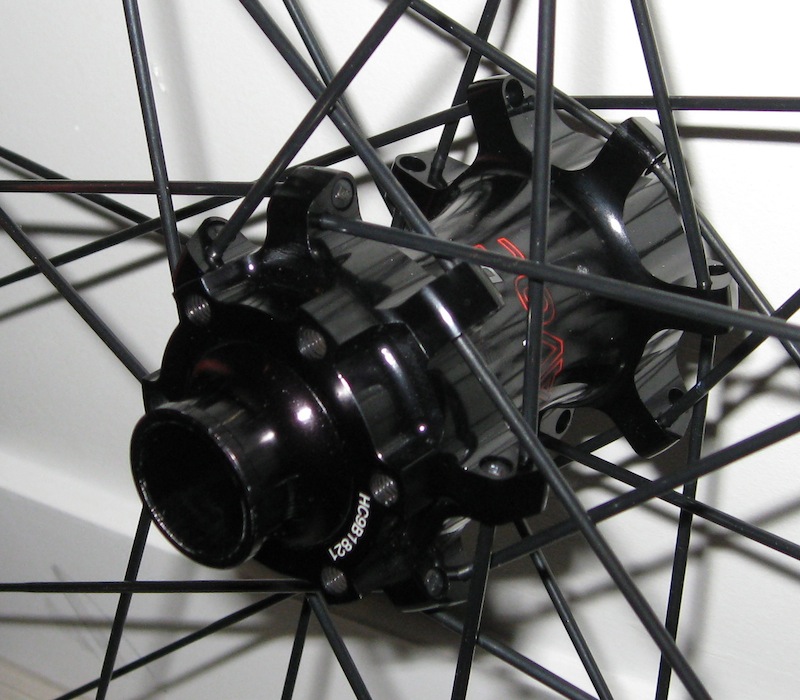
Front 20mm hub.  Lots more tech inside the hub than meets the eye!

As for the seat and seatpost, my thinking was simple.  Get the lightest stuff you can find for a good price.  The Sette line from pricepoint.com seemed to fit the bill.  The seat was $36 and weighs in at 215g while the $20 seatpost is 269g.  By no means the lightest you can find but decent for the money.  Hopefully they won't snap the first time my a$$ smashes into them.  Time will tell. 

Sette Evo seat with Ti rails.  Light and cheap!

Sette seatpost.  I like the security of the double bolts that hold the seat in place.  Reminds me of my Thomson post at a fraction of the cost. 

The build is slowly coming together!  I am hoping I'll have the rest of the parts this week!  
Have experience with the Easton Havoc DH wheelset or cringe at the thought of putting Sette products on your build, let me know in the comments!


Saturday, April 23, 2011

Bike Build: Knolly Podium - Fork and Brakes

by A. Tong

Well, I've been waiting around for parts the past week but unfortunately nothing has arrived yet. So to keep things rolling on the blog I thought I'd post the fork and brakes I'll be using for this build.

One of the most important parts when building a bike is the fork. Lots of people have their preferences in terms of companies but I really don't. I have only had experience with the Fox36 and RockShox Lyrik line up and I really liked both. I did demo a Trek Session 88 with a Fox40 last year at Whistler for a day and it was glorious! Rode very well and I didn't even have time to dial it in! But the down side from what I understand is that maintenance is a little difficult compared to the RockShox Boxxer. Since I'm a very hands on guy and like to wrench on my own bikes, I decided I'd give the Boxxer a try. I found a NEW 2010 Boxxer Team on close out for a great price so it came home with me that day. 

The coil sprung Boxxer Team has a both high and low speed compression (top of stanchion) and rebound adjustment knobs (bottom of stanchion) to dial the fork to the terrain.  If you follow downhill mountain biking you've probably heard of Avalanche Suspension.  They make a kit for the Boxxer that is supposed to make the fork super plush and responsive if you're aren't happy with it in stock form.  I'll ride the fork the way it is for the beginning of the season but if it doesn't perform like I expect it to, I'll look to upgrade.  I am also going to check the oil levels in the fork before riding it as RockShox has a reputation for shipping their forks with either too much or too little oil.  Look for it in a future blog post!


My RocShox Boxxer Team with Straighline direct mount stem and Chromag OSX Fubars!  Purrrrrdy!!!

Another angle.  You can see the high and low speed compression knobs on top of the stanchion. 

Boxxer ready and waiting for the brake caliper.  20mm thru axle keeps things stiff up front!


As for the braking duties, I have an existing set of Avid Juicy 7 with 8 inch rotors.  I used these brakes on my old Kona Coiler Dee-Lux for a season and they performed flawlessly.  The pad and lever adjustment is extremely handy and they work as good as the day I bought them!


Front and Rear Avid Juicy 7 brakes to perform the stopping duties on the Knolly.  These brakes are adjustable, durable, and dependable!


I'm hoping the wheels and headset come next week.  When they do, I'll have a post up ASAP! 

Opinions on the fork or brake selection?  Should I have picked something else?  Please let me know in the comments!

Monday, April 18, 2011

Wheel Building - A First Attempt!

by A. Tong

This isn't much of a tutorial for you readers.  More of a summary of my wheel building experience.  I've wanted to lace up some wheels for some time now but never had a reason to.  Looking at my bike parts inventory, I had 2 front wheels and only 1 rear.  Turns out I also had an extra rear hub and rim laying around so I decided to go for it and try to build a wheel.  

I didn't start out with any great parts.  This wheel build was just to see if I could do it!  The rear hub was a standard Shimano and the rim was an old, but straight, Bontrager.  The spoke and spoke nipples where brand new. 

All the essentials for a wheel build.  Spokes, nipples, a hub, and out of the picture, but an obvious item, is the rim.  A truing stand makes building wheels a piece of cake. 


If you are like me, building a wheel wasn't something I thought I could do.  I've trued wheels before and that was difficult enough, let alone trying to do one from scratch.  Turns out it's a lot easier than I thought it was going to be.  I referenced Sheldon Brown's website and just followed what he wrote.  My only tip would be to read the entire article first before starting.  If you don't, your first attempt might look like mine.  See FAIL below!
All laced up and ready to go....or is it?  If you look closely, all the spokes have been laced from the inside out.  This first try = fail

After I took out all the wrong spokes and relaced them from the correct side, things were peachy!  The real trick to wheel building isn't lacing the wheel but truing (both laterally and vertically) and dishing the rim properly.  I have to say my initial fear that building a wheel from scratch compared to fixing a badly dented wheel was unfounded.  If you follow the steps in the link above and tension the spokes equally as you go, the wheel is almost straight by the time you are done.  A half turn of the spoke wrench here, a quarter turn there and you are done!  Below is the finished product!  I'll write a follow up on this wheel.  After all, a successful wheel build is more than lacing and getting it straight.  It's all about how it works as a wheel! 

Attempt 2 was much more successful!


If you are thinking of building a wheel but not sure if you have the ability, I say go for it!  It's not that difficult and kinda therapeutic.  The cost of building a wheel is only $30-50 so you aren't saving much by doing it yourself, but I'll be building another one again! 

Sunday, April 17, 2011

End of an Era for my Coiler!

by A. Tong

It's sad but it's true.  There comes a time when your trusty steed needs to be put out to pasture.  I am hoping someone will reign her in and put her to good use!  

My 2004 Kona Coiler Dee-Lux is up for sale.  The Coiler has been good to me.  She was ridden mostly as a trail bike but I won't forget the times we hit up the DH park.  I am hoping that she'll find a good home and soon.  At the time this bike was released, it was capable of being the ONE bike.  Burly and strong enough for the bike parks but raise the seat and you're on an epic trail ride.  I personally feel that even in today's market, the Coiler Deelux is still a capable all mountain bike.  I did consider keeping it and using it as my all mountain ride but as I suffer from UPGRADE-ITIS, I was drawn to the Nomad Carbon.
 
She shows some signs of wear but there is not a dent or crack in the frame.  She is as sturdy as the day I bought her.  The BETD plates give her some longer legs (6 and 7 inches travel) but I will include the original 5 inch plates as well.  And for your sitting pleasure, the seat post, collar, and seat are included. Asking $250 CAN. 

2004 Kona Coiler Dee-Lux.  Isn't she a beauty!?!?!.  She's the grandma of the all mountain bike and she'll still go out every weekend and give the owner a great ride :)


Also for sale is my next to new 2008 Fox 36 vanilla RC2.  I have put maybe 5 rides on this fork.  I didn't have the time to ride it and now it has to go to a good home.  The 5 times I did ride it, it was amazing.  If my Nomad didn't have a 1.5 head tube with a very capable Rockshox Lyrik, I'd be keeping this.  Everything is perfect except for a few scuffs on the fork lower.  Whoever picks this one up is going to be a lucky one.  $450 CAN and it's yours!

Update:  Well, about 2 hours after I posted this on Pinkbike, the fork has found a new home.  Lucky guy!

My almost new Fox 36 Vanilla RC2.  Nothing much to say except this is a steal of a deal and an all around awesome fork.  8.75 inch steer tube remaining. 


Email bikelife365@gmail.com if you are interested in either items. 

Saturday, April 16, 2011

Bike Build: Knolly Podium - Cockpit Part 1

by A. Tong

One of the three places your body touches the bike is the grips.  I've been a fan of the ODI lock on grips since they were first introduced and I've used them on all my bikes since.  Normally I go with the Ruffian grips but this time decided to try the Troy Lee Designs series in white with red anodized lock on's.  My hands are on the small side and these grips fit nicely in my hands.  The grips weigh in at 112g with hardware.  Worth the weight in my opinion for security and convenience.

White looks nice now but most likely not so nice after a few rides!

Next up is the 50mm Straightline Components direct mount stem in anodized red.  This blingy bad boy weighs in at 152g with all hardware.  

Made in Canada!  Lookin good!!!


Lastly for today is the handlebar from Chromag.  Tough to weigh a handlebar but the scale says 325g.  I used this bar on my Nomad for all mountain and DH duties and it was awesome.  Nice and wide (30 inches) with a good sweep and 1 inch rise.

Black chrome!  BA-BLING! 


All together it looks something like this.


Excellent start! 


Thanks to Chris @ Calgary Cycle for all your help!

Wednesday, April 13, 2011

Bike Build: Knolly Podium Raw

by A. Tong

Deciding on a downhill (DH) frame was a difficult one for me.  I’ll be honest and tell you I am not the best DH/bike park rider in the world.  I do however ride my other bike, a SantaCruz Nomad Carbon, hard and fast and feel a dedicated DH/bike park bike will make riding gravity assisted trails that much more fun.  When it was time to think seriously about my DH/park bike, my head was a mess.  With all the different frames on the market and all the marketing hype behind them, to say I was confused and conflicted was an understatement. In the end, my frame of choice had to satisfy a few criteria.

Ride Characteristics

Probably one of my favourite things about mountain biking is dirt jumping.  Add those dirt jumps to a DH style course (ie; ALine and Crank it Up at Whistler Mountain Bike Park) and I’m in Heaven.  With that said some DH bikes really like to stick to the ground and tend to plow through obstacles while others prefer to go up and over.  Having a balanced bike that is at home on the ground as well as in the air is something very important to me and from the reviews I’ve read, Knolly Podium owners say it’s exactly that.  Because I already have a SantaCruz Nomad Carbon, the prime focus of my new bike was DH performance.  Uphill performance…meh!  Not this time!!! 

Budget

I like nice bikes and I wanted a top end bike or frame but was on a budget.  I could’ve dropped my cash on an entry level bike, which I’m sure is excellent value for the money but in my case, I had boxes full of bike parts.  So for me, going the frame only option allowed me to build exactly what I wanted.  With that said, I had a hook up that was able to get me a 2011 SantaCruz V10 Carbon for a VERY VERY good price.  The price plus my experience with the Virtual Pivot Point (VPP) suspension system SantaCruz uses put the V10 Carbon at the top of the list.  I was basically sold until I saw the Knolly Podium for a great price at a Spring Sale at Calgary Cycle.  Knolly has a great reputation for being a top quality bike.  No one had one bad thing to say over at MTBR.com so it was an easy sell.  Not to mention it’s Canadian!!!

Large Knolly Podium DH frame in Raw!  Rear shock shown is a Fox RC4. A few other features include a 1.5 headtube and ISCG 05 chain guide mounts. 


Knooly's patented Four by 4 rear suspension linkage.  If you noticed the bottom bracket installed you are correct but more on that part in a future blog post!

Quality

 I won’t spend a dime on anything if it’s poor quality.  From experience, I’ve learned that spending a bit up front for quality saves you big time in the future…especially if you know you are infected with UPGRADE-ITIS.  After some reading on Knolly's website and the Knolly forum on MTBR.com, it’s easy to see Knolly riders love their bikes and a big reason is because they are top notch quality.  Knolly Podium Frame pics and highlights to come!


It’s probably obvious from the blog post title but I went with the Knolly Podium.  So, now that I have a frame, it’s time for the parts!