I've been playing around with my Contour HD camera and thought I'd upload a video. Hope you enjoy and have a good laugh at my expense.
Andy
BikeLife365

Friday, October 21, 2011
Sunday, August 7, 2011
Trek Dirt Series - Review
by A.Tong
My wife and I spent the first week of July biking at the Silver Star Resort and at the Whistler Bike Park. One of the highlights of the trip was taking part in the Trek Dirt Series mountain bike camp again (my second time and my wife's third time). There are so many amazing things about the Dirt Series camps and hopefully I can capture some of them here in this post.
Top Level Coaching
For those who are more advanced with their bike skills and are worried that the coaches won’t be able to teach you anything, put your fears aside. The coaches with the Dirt Series are legit. How legit you ask? Well, I had the absolute pleasure to be coached by Sarah Leishman (www.sarahleishman.com) and Casey Brown. You may or may not have heard their names but they rip and their 3rd and 4th place finishes respectively at this years Crankworx Jeep Air DH reflect that. But they are only 2 of the many qualified coaches I had a chance to ride with. At any given camp, the coaching staff is comprised of Olympians, professional racers, and others who you may have seen in magazines. I also want to give a shout out to coach and Dirt Series founder Candace Shadley. I don’t think you’ll find a better coach than her. She is so good at spotting out little things that improve your riding. If you get the benefit of riding in front of her, don’t be surprised if she yells at you the entire way down the trail! And I mean yelling in a good way. She is constantly watching, correcting, and praising your riding. Don’t be fooled people, these coaches will push you hard to improve!
So these coaches for the Trek Dirt Series have a long list of impressive credentials but can they coach? The easy answer to that is YES! Their teaching methods are very progressive and you gradually work your way up to the more technically difficult skills. The increase in confidence I see in my beginner friend who took the camp is simple amazing! The camps include all skill levels from beginners to advanced so sign up.
Another thing you can expect from the Dirt Series camps are ego-free coaches. When you “train” down the trail, they don’t trick out ever jump with no handers or back flips. Can they do it? Yup! You just need to ask if that is what you want to learn but they aren’t there to prove how awesome they are to the campers. The coaches are there for you the entire time. They are constantly watching you and pointing out things you can tweak to improve.
Value
Personally, I’d pay the $350 all day long for the camps. They are worth every penny but if you want to break down what you get, here you go:
$100 - 2 lift tickets (limited waiting in the lift line; early access to the lift)
$200 – 2 days top of the line Trek bike rentals and Race Face protective gear
$$$$ - 2 days of coaching
Free swag – Maxxis items, Kicking Horse Coffee, along with chances to win some great door prizes
Free Luna bars to munch on for a bit of extra energy
Included lunch for 2 days
Included dinner 1 night with beer(s)
Free technical session (shock setup, general maintenance, etc)
Discount at the host shop (15% off at Skiis and Biikes - SnowCovers)
So you can go ride on your own if you want to but you’re losing money if you don’t sign up for a camp, if you ask me!
But is it for beginners???
YES! YES! YES! When you sign up for the camp you fill out a questioner on your skill level and you will be grouped accordingly. The coaches absolutely won’t make you do anything that they don’t think you can do. The beginner groups have an area set aside to work on bike handling skills even before going down a run. The skills area includes features like small wooded ladder bridges and drops. Even for the intermediate to advanced riders, you can choose to roll down the steep rock face or if you are uncomfortable, skip it for another time. The coaches don’t ever force you to do any stunts you aren’t comfortable with.
Okay, I guess I’ve stood long enough on my soap box. But for those on the teetering on the edge of signing up or not, I hope I have made that decision a bit easier! I’m so impressed by this camp and how much I personally improve every time I go I’m already registered for the co-ed Trek Dirt Series camp this coming September and bringing a friend!
Sunday, July 24, 2011
Knolly Podium - Review
by A. Tong
I've put some legit time on the Knolly Podium and it's time for a review. The wife and I had a chance to spend 7 days riding between Silver Star Resort and the Whistler Bike Park. The Podium did not disappoint.
Probably the best thing I can say about this bike is that I felt comfortable right away. I was surprised that I didn't need even a run or 2 to get the feel of the bike. The large frame is perfect for me (6ft with 50mm stem and 760mm bars).
This bike handles exceptionally well. I was surprised at how I could rail corners. The harder I pushed, the more I was rewarded. This bike is perfect for an aggressive rider. Although the low bottom bracket height aids in handling, I had concerns about clearance over root and rocks. My concerns were unfounded as only once did my pedal hit a rock. Blasting through tight and technical rooty sections was super fun on this bike. Stay loose and off the brakes! There wasn't a section I couldn't tackle with confidence.
Being a DH bike, one of my biggest concerns was how the bike would behave on jump type runs (ie. ALine style). Well, the bike excelled at that too. Popping off the lips were easy and moving the bike in the air was not as issue as well. In fact, I had so much confidence going into the jumps that my main problem was overshooting the landing. The fork did a great job of saving my a$$ on multiple occasions.
Here are a couple of things to note for anyone interested in a Podium.
On washboard sections, the rear end stiffens up while braking. I'm talking super huge brake bumps. To be honest, I think the Session 88 I rode last year did a better job of smoothing those out (it could also be my suspension set up...). But just lay off the brakes and you're gold!
Invest in a decent chain stay protector. I wrapped my chain stay with an old inner tube and it was worn right through after a day. I'll try the sticky Velcro method and see how that works.
Spend time adjusting the suspension. The Fox RC4 has so many adjustments it really takes some time to get it right. I still don't think I have it as good as it can get. I do think the 450lbs spring is a tad on the stiff side for me so I'd like to get a 400lbs to see how that works. It seems I could run just a bit more sag.
Final Thoughts:
I am really happy with this bike. It's not 100% dialed for me right now but tuning the suspension is part of the game. There isn't one part of the bike build that I'm unhappy with except the old shifter and derailleur. But those parts should be replaced by the next Whistler trip this September. This bike is so good that I almost want a Knolly Delerium to replace my Carbon Nomad. But I can tell you right now that will not happen....not this year anyways :)
If you have any questions, please ask away!
If you have any questions, please ask away!
Tuesday, May 31, 2011
Bike Build: Knolly Podium Finished
by A.Tong
The Knolly Podium build is done! Haven't had a chance to ride the
bike on terrain other than the road outside my house but it feels
great!
First impressions:
The bike sits low and long. Shouldn't be a surprise since it is a new
school DH bike. I'm glad I decided to go with the large frame as the
medium would be just a bit too small (I am 6ft tall). Just playing
around with he bike it does seem to want to stick to the ground more
so than my Nomad. As you see it, the bike sits at 41.5lbs. Heavier than I thought it
would be but I could drop 2lbs easy just by switching tires. I love
the Minnion DHF's so unless you have a better idea for a lighter tire,
these are staying!
No one really wants to hear about a parking lot review so I'll skip
right to the pics. I hope to get some real DH time on the Knolly soon so stay tuned for a review.


Labels:
bike,
Chromag,
downhill,
e*thirteen,
easton havoc dh,
Knolly,
mountain biking,
Podium
0
comments

Tuesday, May 24, 2011
Trek Dirt Series - A Quick Look
by A.Tong
“Don’t you just get on a pedal”, my co-worker says to me. While this may be true for the commuter or cyclist who just rides around the city bike paths for fun, turns out that everyone can gain some benefit from taking a course.
My wife was a pretty good beginner-intermediate rider but mentioned in passing that she’d like to be better at dirt jumps and drops. Of course I supported her since I love biking myself! I mentioned to my wife that the Trek Dirt Series was coming to Calgary and that she should consider registering. I didn’t get too much of a response so I let it go but a few days later she called me and said she was registered. A few weeks later she attended the course and to say she was absolutely stoked on her progression after day 1 is an understatement. She came back telling me how great the instructors were and how they progressed step by step through the skills they were learning. It seemed like she learned a lot but I really noticed it the next time we rode together. Before the course I had to wait part way down the trail for her but this time, I looked back and she was there the entire time. That pretty much sold me on registering for the co-ed Trek Dirt Series course in Whistler at the end of the season. And really, who would turn down a trip to ride DH in Whistler?
Just like my wife, I learned so much at the course in Whistler. Friends back home couldn’t believe how much faster I rode just from the 2 day course. We enjoyed ourselves so much that My wife and I are going to make the trip from Calgary to Whistler for 3 courses this year, 2 of which are put on by the Trek Dirt Series. If you have the chance to take the Trek Dirt Series course, I highly recommend it. You will become a better rider, the people there are great, lots of free swag, and its fun!
I'll be capturing the experience this time on the blog and will hopefully tweet some pictures during the course. Expect lots of pics and a review late July.
Thursday, May 19, 2011
From Training Wheels to Big Boy Bike
by A.Tong
I was 8. My legs looked like a bruised banana, more black and blue than skin tone, but it was all worth it!
I was 8. My legs looked like a bruised banana, more black and blue than skin tone, but it was all worth it!
Earlier that day, I decided to take my brothers “big boy” bike and learn to ride without training wheels. I always thought it was so amazing how he could ride the “big boy” bike and not fall over. Too bad for me dad was at work and couldn’t teach me how to ride like he did with my brother. It didn’t matter! I was determined!
I straddled the banana seat on the yellow bike, placed one foot on the pedal, took a deep breath, pushed forward with the other leg and CRASH, down I went! Bruise number 1, check. Bruises 2 through 5 didn’t yield anymore progress but I didn’t give up. On attempt 6, something happened. The “big boy” bike was rolling a bit without my feet on the ground! The excitement was exhilarating! CRASH! Bruise number 6, check. But I couldn’t stop trying now!
At the end of the day and about 40 bruises later, I could ride the “big boy” bike. My little bike with training wheels was destined for someone else from that day on. My first memory of true success!
Sunday, May 15, 2011
Dear Kickstand
by A. Tong
Dear Kickstand,
To this day I can still remember the pride in putting you on my bike as a kid. It was like its passage into bikehood. “From this day on Bike, you’ll be able to stand on your own”! But alas Kickstand, as time went on you met your fate and was destined for the parts bin, if not the trash. Your siblings the reflector and cassette shield had a similar fate it seemed. It’s heartbreaking that something as functional as you was traded in for pure vanity but it’s hard to resist the sleek urban look of a fixie. No brake or shifter lines to obscure the natural beauty and flow of the bike. No ugly reflectors to obscure your color combination of choice. And YOU Kickstand, the biggest offender of all! Your form is void of any consideration of style whatsoever.
As I’ve matured, Kickstand, I’ve realized that I miss you. I have fond memories of us together as kids. We could ride to the corner store without fear of scratching Bike while leaning it against Wall. Since my hasty decision to rid you from my life, arguments between Bike and Wall are a regular occurrence. When I see the resulting wounds of dents and scratches on Bike after a fight, those are the times I am reminded of you.
I hope, Kickstand, we are reunited one day.
Wednesday, May 11, 2011
Messenger Bags for the Daily Commuter?
by A. Tong
Since it was Bike to Work Day here in Calgary a few days ago, I thought it would be fitting to show what I use to carry my daily essentials to work.
It seems these days that messenger bags are all the rage. Not only do you see messengers wearing them but also daily commuters. So what makes these bags so popular? Wouldn't carrying all the weight on one shoulder hurt? I had the same questions so I decided to sew one (I'm pretty handy) and see what the madness was all about!
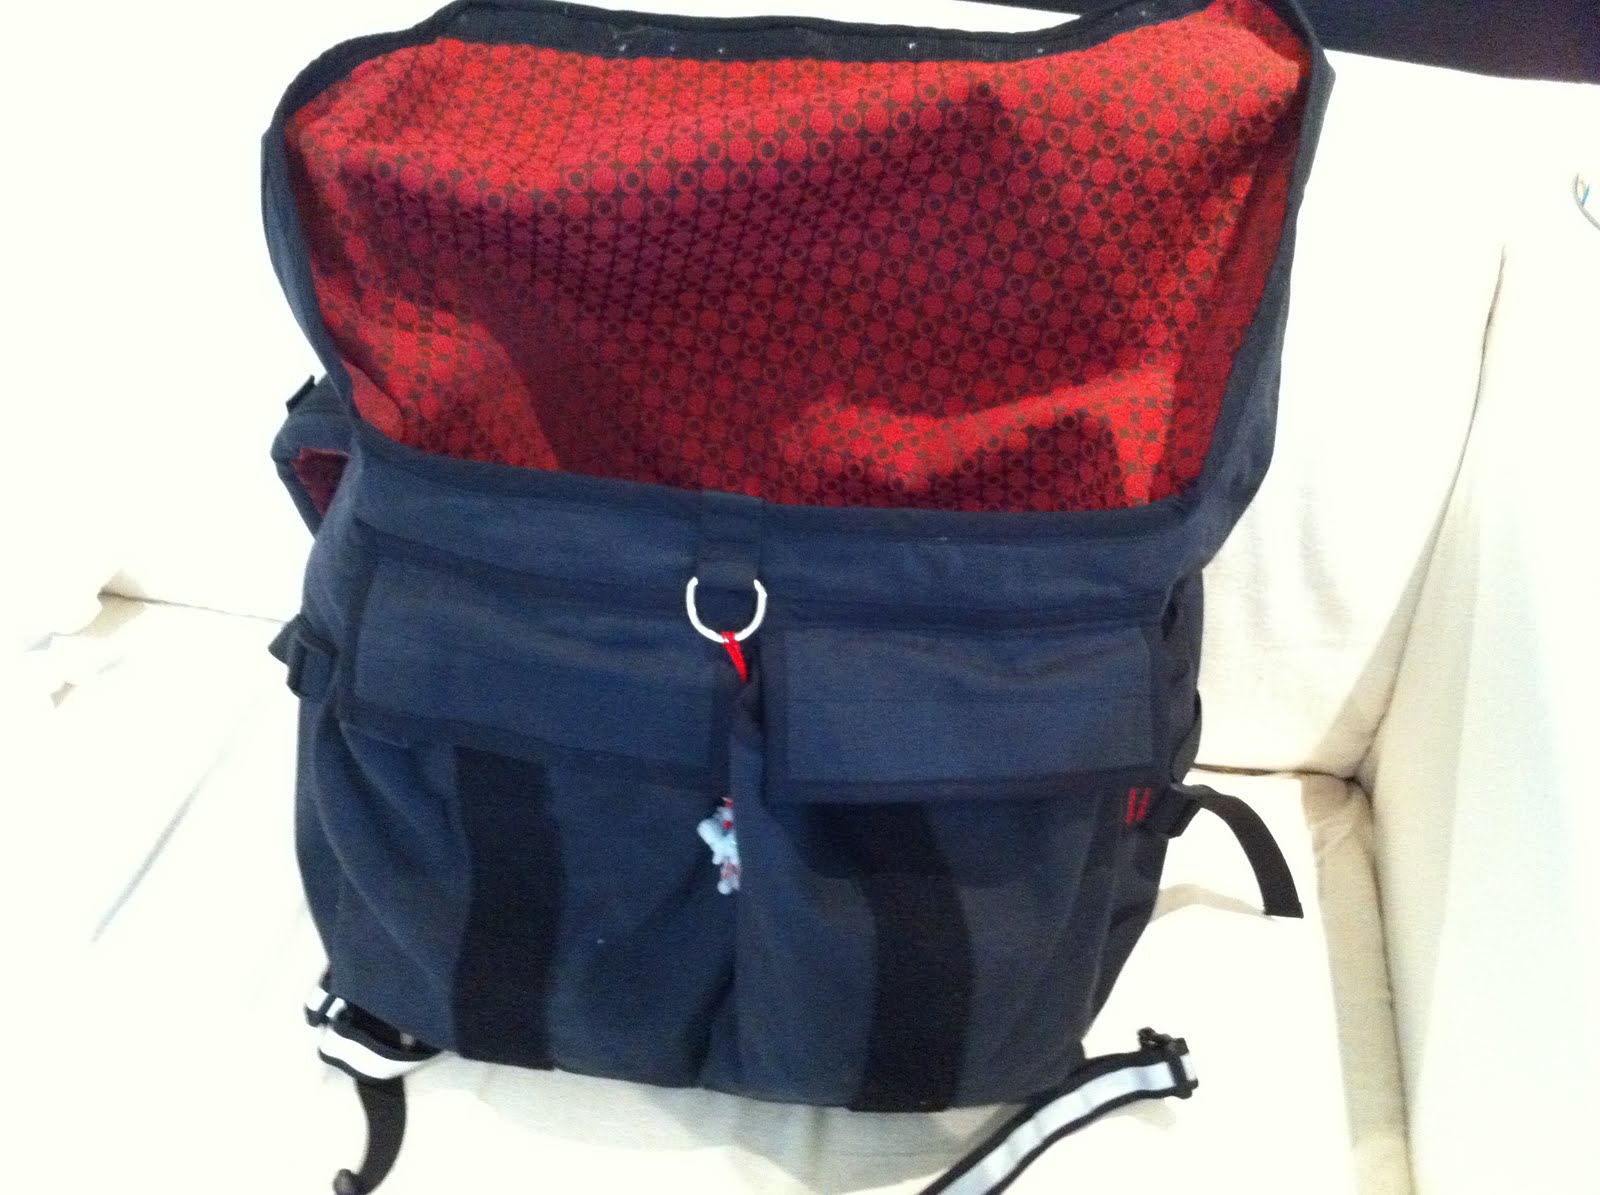
I tried to make my bag as similar to those used by real messengers (like Timbuk2 and Chrome messenger bags). At the time this bag was made, I had a hard time sourcing the materials used in real messenger bags so I had to improvise. I used an outer layer of cotton canvas, a middle layer of a thick vinyl, and an inner layer of cotton just for looks. I think it turned out pretty darn good and best of all, the durability and strength of the bag has not been an issue. I have sourced the proper materials since this first bag was made and I am certain the stronger materials would increase the life expectancy of the bag exponentially!
I used this bag, and another I made just like it, on and off for 3 years commuting to and from work. My commutes were only about 30 minutes long but this bag was extremely comfortable even when hauling a bag full of groceries. Compared to the backpack I used to wear, the messenger bag is MUCH MORE comfortable. Keep in mind a good stabilizer strap is essential to comfort. Probably the best thing about a messenger bag was the convenience! If I had to make a pit stop and needed something from the bag, I just swung it around my shoulder, grabbed what I needed, and swung it back. Quick and easy!!! I highly recommend everyone at least try a messenger bag for their commuting needs.
Here are a few quick photos of the bag I made.
 |
| Thick shoulder pads help distribute heavy loads. Quick release seat belt buckle adds some uniqueness! |
 |
| I embroidered this onto the front of the bag. It's supposed to be a tree if you can't tell :) Reflective straps add a bit of safety factor on those late night commutes home. |
 |
| Two small accessory pouches and one main compartment make it easy to organize your junk! |
 |
| Huge main compartment! Think 2 six packs easy! |
Its been a while since I made a bag so now is as good a time as any to make another! If anyone has some ideas of what to embroider on the front or any other innovative ideas, let me know in the comments section or send me an email!
Monday, May 9, 2011
DIY Headset Press
by A. Tong
Probably one of the tools that is the most difficult to justify for a home bike mechanic is a headset press. It is rarely used and costs a lot for the amount of times you'll use it. There are however, other methods of installing a headset.
The first method I used was the good 'ol wooden block and hammer method. Make sure the headset is sitting square in the head tube, place the wooden block on the headset and smash away! I've done it before and it worked fine, but not something I'd want to do with the Knolly build.
The second way is to make your own headset press. It's pretty easy but my first try a few years back worked okay. Basically it was a threaded rod with a few washers and nuts. It worked to press in some bearings but the washers didn't keep the bearings straight when I started tightening the bolt. My thought was that the washers had too large an inner diameter allowing the washes to move too much. Also, with a nut on both ends, it was hard to keep one end from twisting as I tightened the nut.
The second way is to make your own headset press. It's pretty easy but my first try a few years back worked okay. Basically it was a threaded rod with a few washers and nuts. It worked to press in some bearings but the washers didn't keep the bearings straight when I started tightening the bolt. My thought was that the washers had too large an inner diameter allowing the washes to move too much. Also, with a nut on both ends, it was hard to keep one end from twisting as I tightened the nut.
Try #2 with a few mods to the headset press. The main difference this time would be the addition of 2 blocks of wood with a 1/2 inch hole drilled through the middle. The blocks of wood worked better than just the washers because they stayed perpendicular with the threaded rod.
Here is what you'll need to make your own press:
two 7 inch bolts, 1/2 inch diameter
1 bolt coupler (long bolt in the picture below)
note: you can use one long threaded rod if you can find one
3 small washers
3 large washers
3 nuts
2 pieces of wood with 1/2 inch holes drilled through
Here is a pic of the pieces assembled.
And here it is in action!
When using the tool make sure the headset cup is resting on the stationary wood block. The sliding block should rest against either the head tube or seated headset cup. This should pull the headset cup straight into the head tube. An added bonus of the wood is that it doesn't scratch the headset.
Did this work for you? Have an idea on how to make it better? Put it in the comments below please!
Here is what you'll need to make your own press:
two 7 inch bolts, 1/2 inch diameter
1 bolt coupler (long bolt in the picture below)
note: you can use one long threaded rod if you can find one
3 small washers
3 large washers
3 nuts
2 pieces of wood with 1/2 inch holes drilled through
 |
| Pieces you'll need to make your own head set press. Works like a charm! |
Here is a pic of the pieces assembled.
 |
| Note the use of 2 nuts on the lower and 1 on the upper bolt. |
 |
| Here it is finished. The lower block stays permanently in place help by 2 nuts. The long nut is the coupler holding the 2 bolts together. Note the is no nut below the upper block. This allows the top block to slide towards the lower block as you tighten the upper nut. |
And here it is in action!
 |
| Ewww! Mold! Hold the bottom nut tight and crank of the top. |
When using the tool make sure the headset cup is resting on the stationary wood block. The sliding block should rest against either the head tube or seated headset cup. This should pull the headset cup straight into the head tube. An added bonus of the wood is that it doesn't scratch the headset.
Did this work for you? Have an idea on how to make it better? Put it in the comments below please!
Sunday, May 8, 2011
Bike Build: Knolly Podium - Chris King Headset
By A. Tong
The final major piece of the puzzle is here! What can I say about Chris King other than it's a company that offers super high quality, durable and reliable components! Chris King pioneered the sealed bearing headset in 1976 and continue to this day to make high end, precision bike components. I had one on my old Kona for years with no problems.
For the Knolly Podium build up, I chose purchased a 1.5 to 1-1/8 Chris King Devolution headset in red to match the theme I have going with the bike. While I always try to support the local bike stores, I have to give props to aspirevelotech.com for their exceptional customer service. I purchased a 1.5 Chris King headset from them months ago for a different bike build. I decided in the end to not go with that project and had an unused headset sitting in the package. A quick email to aspirevelotech.com and a few weeks later they gladly exchanged my existing headset for the one I needed. Great service guys!
 |
| Chris "Bling" King head set with new Pre Loader to tighten down the top cap. Looks great and works even better! |
Saturday, May 7, 2011
Calgary Bike to Work Day 2011 - Recap
by A. Tong
Bike to work day in Calgary for 2011 has come and gone. As a participant, I would say it was a great success! "Bike doctors" at the energy pit stops were busy fixing issues commuters had while others at the stops were handing out freebies like fruit, water bottles, and patch kits! I stopped by the tent set up by Ridley's Cycle to snap some photos. I don't think you'd see a happier bunch of people at 7:00am in the morning, especially compared to many of the drones that march onto the bus headed for downtown every morning . I got some shots and continued on my way to the free breakfast at Eau Claire Market. As I approached the event I could hear some live music! Round the corner and I saw a large group of cyclists gathering around the event area! Along with the free breakfast, free coffee was provided by Starbucks, Twitter followers of @Bike2WorkDayYYC had a chance to win a free commuter bike provided by BikeBike, and a table with free patch kits were just some of the things going during the event.
Bike to work day in Calgary for 2011 has come and gone. As a participant, I would say it was a great success! "Bike doctors" at the energy pit stops were busy fixing issues commuters had while others at the stops were handing out freebies like fruit, water bottles, and patch kits! I stopped by the tent set up by Ridley's Cycle to snap some photos. I don't think you'd see a happier bunch of people at 7:00am in the morning, especially compared to many of the drones that march onto the bus headed for downtown every morning . I got some shots and continued on my way to the free breakfast at Eau Claire Market. As I approached the event I could hear some live music! Round the corner and I saw a large group of cyclists gathering around the event area! Along with the free breakfast, free coffee was provided by Starbucks, Twitter followers of @Bike2WorkDayYYC had a chance to win a free commuter bike provided by BikeBike, and a table with free patch kits were just some of the things going during the event.
The best part of the day was the sightings of people who were on their bikes who don't regularly commute. After all, isn't that the whole point of the event, to get more people biking to work? Hopefully a few of them will realize how easy and fun it is to continue the commute!
Thanks to the organizers for putting on a great event! You can see a link to the event sponsors here.
Here are a bunch of pics I snapped to capture the day!
 |
| Freebies being given out at the Ridley's Cycle pit stop tent. |
 |
| Ridley's Cycle Bike Doctor looking over a bike. |
 |
| Bike Doctor from Bow Cycle working away! |
 |
| Live music at the FREE breakfast event! |
 |
| Nothing like a free hot coffee from Starbucks on a cool morning commute! |
 |
| Line up for the free breakfast She looks happy! |
 |
| Pics submitted to Twitter followers of @Bike2WorkDayYYC had a chance to win a bike. |
 |
| Come on, more free stuff? Why wouldn't you participate? |
 |
| Bikes of all kinds! |
 |
| My Surly Cross Check commuter. Woops, looks like that front brake cable is a tad long. |
 |
| I think she needs a basket on the front. Maybe like an old wood crate? What do you think? |
 |
| Bike down! Bike down! Wait a minute, that's mine. I need a kickstand! |
Labels:
bike,
bike to work day,
Bowcycle,
Calgary,
commuter,
Ridley's Cycle,
Surly Cross Check
0
comments
Thursday, May 5, 2011
Calgary Bike to Work Day - May 6, 2011
by A. Tong
May 6, 2011 is Bike to Work day in Calgary Alberta! If you haven't ridden your bike yet this season this is a great day to start! This event is put on annually to encourage the thousands of Calgarians who commute daily into downtown to consider a healthier and greener method, a BIKE! Calgary has an extensive pathway system that can take you from one end of the city to the other. No more excuses! Time to make use of our bike paths folks!
"Energy Pit Stop" stations will be set up around downtown Calgary offering free tune ups, information, snacks, and other give aways! There will also be a free breakfast at the Eau Claire Market!
Don't miss out! Commuting by bike is simple, fun, and a good way to get your exercise.
Tuesday, May 3, 2011
Bike Build: Knolly Podium - Drivetrain
by A. Tong
Time for an update on the build.
When I was planning this build I had all intentions to reuse my existing crank set, bottom bracket, shifter, and rear derailleur. Well, turns out the Truvativ Gigabite BB just didn't fit right. It is supposed to be compatible with the 83mm bottom bracket shell but the spindle was off center. Luckily for me, the shop that sold me my Knolly Podium frame was able to give me a great deal on some cranks. Enter the e*thirteen DH cranks!
This crank set is something else. Super sweet matte black crank arms with the e*thirteen in glossy black. The most outstanding feature for me on this crank set is the polygon interface between the crank arm and spindle. This should provide a nice stiff interface with the bike! I tend to hate proprietary parts and was cringing at the fact I'd have to buy another bottom bracket tool but thankfully, e*thirteen includes a tool to install the bottom bracket cups.
While I was on the e*thirteen train I thought I'd pick up their LG1 ISCG 05 chainguide. My wife runs this on her Norco DH with no problems so it was an easy choice for me. I chose to go with the 36-40T model in the event I need to add a larger chainring in the future.
Speaking of chainrings, I decide on going with Chromag. Chromag CNC machines the 7075 aluminum chainrings with a taller profile to help prevent dropped chains. But to be honest, I love their OSX bars and adding a bit more Chromag bling doesn't hurt!
Here are some pics. Unfortunately I didn't get pics of the parts separately but I'll be sure to take some more detailed photos from now on.
Fortunately for the budget, the Shimano XT shifter and rear derailleur from my old 2004 Kona Coiler Deelux still work OK so I'll use those for the time being. The spring in the derailleur is a bit weak after 7 years of service but for the limited shifting I need it to do, I'll give it a go.
Just waiting on the headset which should be here in the next few days. Once it's on, I'll snap some pics and give a parking lot review!
When I was planning this build I had all intentions to reuse my existing crank set, bottom bracket, shifter, and rear derailleur. Well, turns out the Truvativ Gigabite BB just didn't fit right. It is supposed to be compatible with the 83mm bottom bracket shell but the spindle was off center. Luckily for me, the shop that sold me my Knolly Podium frame was able to give me a great deal on some cranks. Enter the e*thirteen DH cranks!
This crank set is something else. Super sweet matte black crank arms with the e*thirteen in glossy black. The most outstanding feature for me on this crank set is the polygon interface between the crank arm and spindle. This should provide a nice stiff interface with the bike! I tend to hate proprietary parts and was cringing at the fact I'd have to buy another bottom bracket tool but thankfully, e*thirteen includes a tool to install the bottom bracket cups.
While I was on the e*thirteen train I thought I'd pick up their LG1 ISCG 05 chainguide. My wife runs this on her Norco DH with no problems so it was an easy choice for me. I chose to go with the 36-40T model in the event I need to add a larger chainring in the future.
Speaking of chainrings, I decide on going with Chromag. Chromag CNC machines the 7075 aluminum chainrings with a taller profile to help prevent dropped chains. But to be honest, I love their OSX bars and adding a bit more Chromag bling doesn't hurt!
Here are some pics. Unfortunately I didn't get pics of the parts separately but I'll be sure to take some more detailed photos from now on.
 |
| Here are the parts playing nicely together. Sorry e*thirteen for the upside down crank. I'll do better next time. |
 |
| 36 tooth red Chromag chainring mated to e*thirteen DH crank. A think of beauty if I do say so myself! |
 |
| A shot of the everything together! |
 |
| On the bike and ready for some pedals! |
Fortunately for the budget, the Shimano XT shifter and rear derailleur from my old 2004 Kona Coiler Deelux still work OK so I'll use those for the time being. The spring in the derailleur is a bit weak after 7 years of service but for the limited shifting I need it to do, I'll give it a go.
Just waiting on the headset which should be here in the next few days. Once it's on, I'll snap some pics and give a parking lot review!
Wednesday, April 27, 2011
Bike Build: Knolly Podium - Wheels, Seat, and Seatpost
by A. Tong
The parts from pricepoint.com have arrived! I have to say I am more than impressed with them! The order was shipped out the same day as I ordered and 10 days later, it was at my door step. Not bad considering I'm ordering from Canada. I highly recommend anyone try them out! In fact, I am putting together another list of parts for a DJ build I'm thinking of. More on that later.
The parts from pricepoint.com have arrived! I have to say I am more than impressed with them! The order was shipped out the same day as I ordered and 10 days later, it was at my door step. Not bad considering I'm ordering from Canada. I highly recommend anyone try them out! In fact, I am putting together another list of parts for a DJ build I'm thinking of. More on that later.
So I decided to go with what I think are some pretty good wheels without having to shell out the big bucks for the more blingly and popular choices. These wheels were on sale for $349US and I just couldn't say no. From the reviews I've read, these are ready to take a pounding day after day and come back for more. For some reason this particular review sold me. For the more techy reader, Pinkbike has an excellent overview of the wheelset. Just a note, these wheels came in a bit heavier than stated in the Pinkbike review. I measured them at 1317g and 1137g for the rear and front wheels respectively with the rim strips installed.
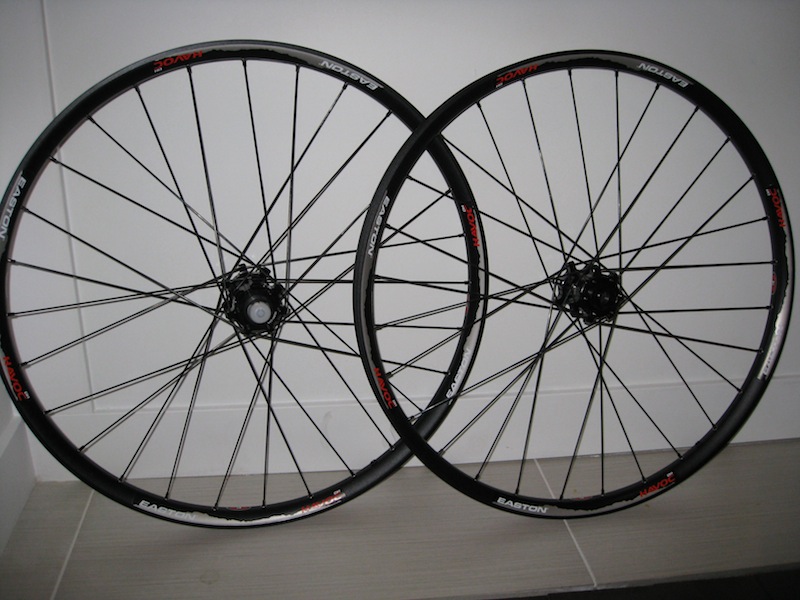 |
| Easton Havoc DH wheels. Nothing too exciting compared to the shinier wheels out there but the price is right at $349! Total weight of the wheels is 2454g with rim strips and that little plastic cap on the rear wheel. Subtract 1-2g for that if you want. |
 |
| Straight pull spokes increase the strength of the wheel and in my opinion, look pretty darn good! |
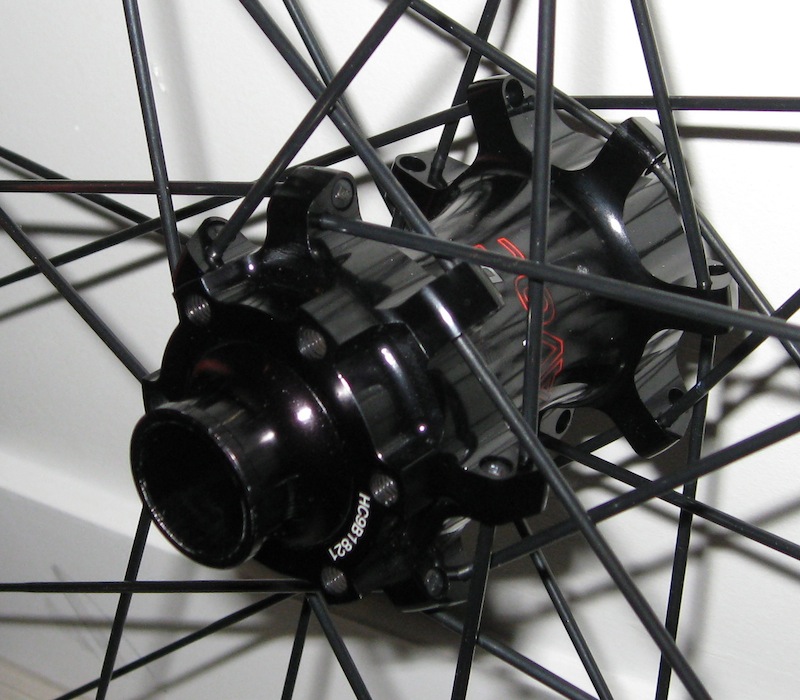 |
| Front 20mm hub. Lots more tech inside the hub than meets the eye! |
As for the seat and seatpost, my thinking was simple. Get the lightest stuff you can find for a good price. The Sette line from pricepoint.com seemed to fit the bill. The seat was $36 and weighs in at 215g while the $20 seatpost is 269g. By no means the lightest you can find but decent for the money. Hopefully they won't snap the first time my a$$ smashes into them. Time will tell.
 |
| Sette Evo seat with Ti rails. Light and cheap! |
 |
| Sette seatpost. I like the security of the double bolts that hold the seat in place. Reminds me of my Thomson post at a fraction of the cost. |
The build is slowly coming together! I am hoping I'll have the rest of the parts this week!
Have experience with the Easton Havoc DH wheelset or cringe at the thought of putting Sette products on your build, let me know in the comments!
Saturday, April 23, 2011
Bike Build: Knolly Podium - Fork and Brakes
by A. Tong
Well, I've been waiting around for parts the past week but unfortunately nothing has arrived yet. So to keep things rolling on the blog I thought I'd post the fork and brakes I'll be using for this build.
Well, I've been waiting around for parts the past week but unfortunately nothing has arrived yet. So to keep things rolling on the blog I thought I'd post the fork and brakes I'll be using for this build.
One of the most important parts when building a bike is the fork. Lots of people have their preferences in terms of companies but I really don't. I have only had experience with the Fox36 and RockShox Lyrik line up and I really liked both. I did demo a Trek Session 88 with a Fox40 last year at Whistler for a day and it was glorious! Rode very well and I didn't even have time to dial it in! But the down side from what I understand is that maintenance is a little difficult compared to the RockShox Boxxer. Since I'm a very hands on guy and like to wrench on my own bikes, I decided I'd give the Boxxer a try. I found a NEW 2010 Boxxer Team on close out for a great price so it came home with me that day.
The coil sprung Boxxer Team has a both high and low speed compression (top of stanchion) and rebound adjustment knobs (bottom of stanchion) to dial the fork to the terrain. If you follow downhill mountain biking you've probably heard of Avalanche Suspension. They make a kit for the Boxxer that is supposed to make the fork super plush and responsive if you're aren't happy with it in stock form. I'll ride the fork the way it is for the beginning of the season but if it doesn't perform like I expect it to, I'll look to upgrade. I am also going to check the oil levels in the fork before riding it as RockShox has a reputation for shipping their forks with either too much or too little oil. Look for it in a future blog post!
 |
| My RocShox Boxxer Team with Straighline direct mount stem and Chromag OSX Fubars! Purrrrrdy!!! |
 |
| Another angle. You can see the high and low speed compression knobs on top of the stanchion. |
 |
| Boxxer ready and waiting for the brake caliper. 20mm thru axle keeps things stiff up front! |
As for the braking duties, I have an existing set of Avid Juicy 7 with 8 inch rotors. I used these brakes on my old Kona Coiler Dee-Lux for a season and they performed flawlessly. The pad and lever adjustment is extremely handy and they work as good as the day I bought them!
 |
| Front and Rear Avid Juicy 7 brakes to perform the stopping duties on the Knolly. These brakes are adjustable, durable, and dependable! |
I'm hoping the wheels and headset come next week. When they do, I'll have a post up ASAP!
Opinions on the fork or brake selection? Should I have picked something else? Please let me know in the comments!
Monday, April 18, 2011
Wheel Building - A First Attempt!
by A. Tong
This isn't much of a tutorial for you readers. More of a summary of my wheel building experience. I've wanted to lace up some wheels for some time now but never had a reason to. Looking at my bike parts inventory, I had 2 front wheels and only 1 rear. Turns out I also had an extra rear hub and rim laying around so I decided to go for it and try to build a wheel.
This isn't much of a tutorial for you readers. More of a summary of my wheel building experience. I've wanted to lace up some wheels for some time now but never had a reason to. Looking at my bike parts inventory, I had 2 front wheels and only 1 rear. Turns out I also had an extra rear hub and rim laying around so I decided to go for it and try to build a wheel.
I didn't start out with any great parts. This wheel build was just to see if I could do it! The rear hub was a standard Shimano and the rim was an old, but straight, Bontrager. The spoke and spoke nipples where brand new.
 |
| All the essentials for a wheel build. Spokes, nipples, a hub, and out of the picture, but an obvious item, is the rim. A truing stand makes building wheels a piece of cake. |
If you are like me, building a wheel wasn't something I thought I could do. I've trued wheels before and that was difficult enough, let alone trying to do one from scratch. Turns out it's a lot easier than I thought it was going to be. I referenced Sheldon Brown's website and just followed what he wrote. My only tip would be to read the entire article first before starting. If you don't, your first attempt might look like mine. See FAIL below!
 | |
| All laced up and ready to go....or is it? If you look closely, all the spokes have been laced from the inside out. This first try = fail |
After I took out all the wrong spokes and relaced them from the correct side, things were peachy! The real trick to wheel building isn't lacing the wheel but truing (both laterally and vertically) and dishing the rim properly. I have to say my initial fear that building a wheel from scratch compared to fixing a badly dented wheel was unfounded. If you follow the steps in the link above and tension the spokes equally as you go, the wheel is almost straight by the time you are done. A half turn of the spoke wrench here, a quarter turn there and you are done! Below is the finished product! I'll write a follow up on this wheel. After all, a successful wheel build is more than lacing and getting it straight. It's all about how it works as a wheel!
 |
| Attempt 2 was much more successful! |
If you are thinking of building a wheel but not sure if you have the ability, I say go for it! It's not that difficult and kinda therapeutic. The cost of building a wheel is only $30-50 so you aren't saving much by doing it yourself, but I'll be building another one again!
Sunday, April 17, 2011
End of an Era for my Coiler!
by A. Tong
It's sad but it's true. There comes a time when your trusty steed needs to be put out to pasture. I am hoping someone will reign her in and put her to good use!
My 2004 Kona Coiler Dee-Lux is up for sale. The Coiler has been good to me. She was ridden mostly as a trail bike but I won't forget the times we hit up the DH park. I am hoping that she'll find a good home and soon. At the time this bike was released, it was capable of being the ONE bike. Burly and strong enough for the bike parks but raise the seat and you're on an epic trail ride. I personally feel that even in today's market, the Coiler Deelux is still a capable all mountain bike. I did consider keeping it and using it as my all mountain ride but as I suffer from UPGRADE-ITIS, I was drawn to the Nomad Carbon.
She shows some signs of wear but there is not a dent or crack in the frame. She is as sturdy as the day I bought her. The BETD plates give her some longer legs (6 and 7 inches travel) but I will include the original 5 inch plates as well. And for your sitting pleasure, the seat post, collar, and seat are included. Asking $250 CAN.
 |
| 2004 Kona Coiler Dee-Lux. Isn't she a beauty!?!?!. She's the grandma of the all mountain bike and she'll still go out every weekend and give the owner a great ride :) |
Also for sale is my next to new 2008 Fox 36 vanilla RC2. I have put maybe 5 rides on this fork. I didn't have the time to ride it and now it has to go to a good home. The 5 times I did ride it, it was amazing. If my Nomad didn't have a 1.5 head tube with a very capable Rockshox Lyrik, I'd be keeping this. Everything is perfect except for a few scuffs on the fork lower. Whoever picks this one up is going to be a lucky one. $450 CAN and it's yours!
Update: Well, about 2 hours after I posted this on Pinkbike, the fork has found a new home. Lucky guy!
Update: Well, about 2 hours after I posted this on Pinkbike, the fork has found a new home. Lucky guy!
 |
| My almost new Fox 36 Vanilla RC2. Nothing much to say except this is a steal of a deal and an all around awesome fork. 8.75 inch steer tube remaining. |
Email bikelife365@gmail.com if you are interested in either items.
Saturday, April 16, 2011
Bike Build: Knolly Podium - Cockpit Part 1
by A. Tong
One of the three places your body touches the bike is the grips. I've been a fan of the ODI lock on grips since they were first introduced and I've used them on all my bikes since. Normally I go with the Ruffian grips but this time decided to try the Troy Lee Designs series in white with red anodized lock on's. My hands are on the small side and these grips fit nicely in my hands. The grips weigh in at 112g with hardware. Worth the weight in my opinion for security and convenience.
One of the three places your body touches the bike is the grips. I've been a fan of the ODI lock on grips since they were first introduced and I've used them on all my bikes since. Normally I go with the Ruffian grips but this time decided to try the Troy Lee Designs series in white with red anodized lock on's. My hands are on the small side and these grips fit nicely in my hands. The grips weigh in at 112g with hardware. Worth the weight in my opinion for security and convenience.
 |
| White looks nice now but most likely not so nice after a few rides! |
Next up is the 50mm Straightline Components direct mount stem in anodized red. This blingy bad boy weighs in at 152g with all hardware.
 |
| Made in Canada! Lookin good!!! |
Lastly for today is the handlebar from Chromag. Tough to weigh a handlebar but the scale says 325g. I used this bar on my Nomad for all mountain and DH duties and it was awesome. Nice and wide (30 inches) with a good sweep and 1 inch rise.
 |
| Black chrome! BA-BLING! |
All together it looks something like this.

 |
| Excellent start! |
Thanks to Chris @ Calgary Cycle for all your help!
Labels:
Calgary Cycle,
Chromag,
downhill,
Knolly,
ODI,
Podium,
stem,
Straighline Components
0
comments
Wednesday, April 13, 2011
Bike Build: Knolly Podium Raw
by A. Tong
Deciding on a downhill (DH) frame was a difficult one for me. I’ll be honest and tell you I am not the best DH/bike park rider in the world. I do however ride my other bike, a SantaCruz Nomad Carbon, hard and fast and feel a dedicated DH/bike park bike will make riding gravity assisted trails that much more fun. When it was time to think seriously about my DH/park bike, my head was a mess. With all the different frames on the market and all the marketing hype behind them, to say I was confused and conflicted was an understatement. In the end, my frame of choice had to satisfy a few criteria.
Deciding on a downhill (DH) frame was a difficult one for me. I’ll be honest and tell you I am not the best DH/bike park rider in the world. I do however ride my other bike, a SantaCruz Nomad Carbon, hard and fast and feel a dedicated DH/bike park bike will make riding gravity assisted trails that much more fun. When it was time to think seriously about my DH/park bike, my head was a mess. With all the different frames on the market and all the marketing hype behind them, to say I was confused and conflicted was an understatement. In the end, my frame of choice had to satisfy a few criteria.
Ride Characteristics
Probably one of my favourite things about mountain biking is dirt jumping. Add those dirt jumps to a DH style course (ie; ALine and Crank it Up at
Budget
I like nice bikes and I wanted a top end bike or frame but was on a budget. I could’ve dropped my cash on an entry level bike, which I’m sure is excellent value for the money but in my case, I had boxes full of bike parts. So for me, going the frame only option allowed me to build exactly what I wanted. With that said, I had a hook up that was able to get me a 2011 SantaCruz V10 Carbon for a VERY VERY good price. The price plus my experience with the Virtual Pivot Point (VPP) suspension system SantaCruz uses put the V10 Carbon at the top of the list. I was basically sold until I saw the Knolly Podium for a great price at a Spring Sale at Calgary Cycle. Knolly has a great reputation for being a top quality bike. No one had one bad thing to say over at MTBR.com so it was an easy sell. Not to mention it’s Canadian!!!
 |
| Large Knolly Podium DH frame in Raw! Rear shock shown is a Fox RC4. A few other features include a 1.5 headtube and ISCG 05 chain guide mounts. |
 |
| Knooly's patented Four by 4 rear suspension linkage. If you noticed the bottom bracket installed you are correct but more on that part in a future blog post! |
Quality
I won’t spend a dime on anything if it’s poor quality. From experience, I’ve learned that spending a bit up front for quality saves you big time in the future…especially if you know you are infected with UPGRADE-ITIS. After some reading on Knolly's website and the Knolly forum on MTBR.com, it’s easy to see Knolly riders love their bikes and a big reason is because they are top notch quality. Knolly Podium Frame pics and highlights to come!
It’s probably obvious from the blog post title but I went with the Knolly Podium. So, now that I have a frame, it’s time for the parts!
Subscribe to:
Posts (Atom)